Notebook

paper post: budgeting for postage

littlebitheart_paperpost_budgetingforpostage

We are a little bit obsessed with postage. But one thing we haven’t talked about is budgeting for postage- it’s important to think about this when you’re figuring out your paper budget. Even if it’s a back-of-your-mind thought, knowing around how much you’ll be spending on postage ahead of time is better than being surprised with it later!

Your stationer will be a fantastic resource when it comes to postage- we do mail out a lot! If you have any questions, just ask!

Here’s the breakdown- just so you have a general idea:

– For a basic set- invitation, reply card + envelope and one insert- you might be able to get away with just one first class, one ounce stamp (.66 as of January 2024), depending on how heavy your paper is. Remember though: weigh it twice, stamp it once! Take your invite to the post office to be weighed and sized for postage to be sure that you’re putting on the correct amount. If you have any international addresses, don’t forget to ask about the additional postage or requirements for those!

–  Most of the wedding invitations we mail take the 2 ounce rate (.90 as of January 2024), so we use this as a standard guideline. In addition to weight and size, the thickness of the invitation also figures into the price, so things like heavy paper or a ribbon bellyband can bump (literally) you up to the next tier. Better to be surprised with less postage than surprised with more!

– Square envelopes: there is always a surcharge for square envelopes, no matter how small it is. Your postage will start at the two ounce rate, depending on size and weight.

– Boxed invitations: again, this will depend on weight and size but expect this to start in the $5/each range.

– RSVP envelopes + postcards: a standard size RSVP envelope will take a first class, one ounce stamp (.66 as of January 2024). Postcard postage is a bit less (see our post on the pros and cons of postcards here) as long as it meets the size, weight and thickness requirements.

Even if you’ve confirmed the postage rate when you bought your stamps, it’s always a good idea to double check when you go to mail them out as well!

background image: laura gordon photography from the envision workshop styled shoot

paper post: envelope & card sizes

littlebitheart_paperpost_env&cardsizes

Let’s talk a little bit about envelope and card sizes, shall we?

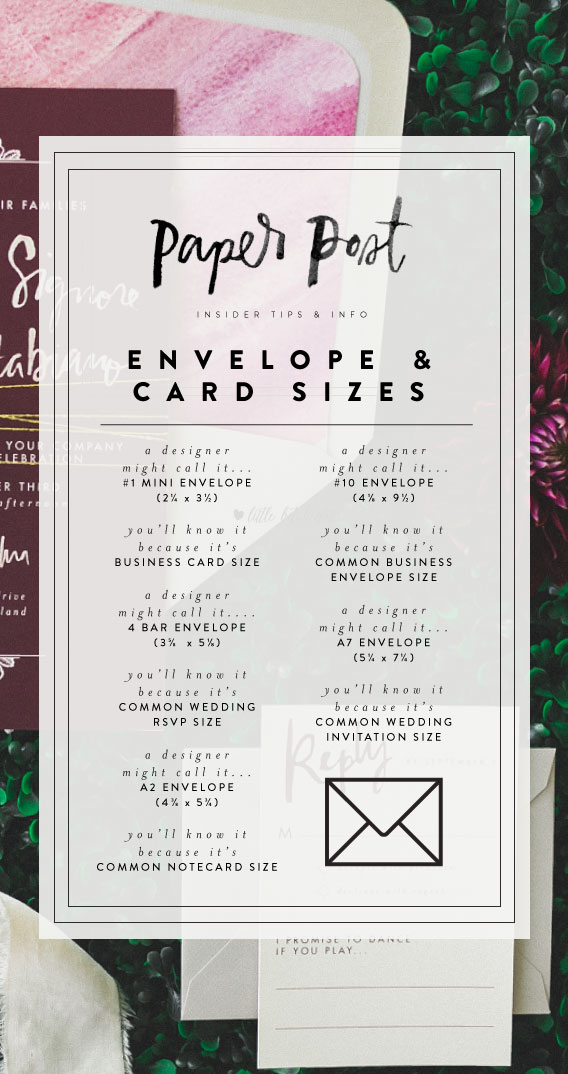
We usually include measurements in our emails and contracts- we think it’s nice to know what you’re paying for!- but it can be hard to visualize what a measurement looks like when you can’t relate it to something you’re familiar with. So here’s a quick guide to the common envelope sizes and what they look like in the real world. In size order:

– #1 mini envelope: these are those cute little envelopes that you can slide your business cards into. We also think they’re fun for gift tags or escort cards!

– 4 bar: if you’ve RSVPed to a wedding lately, there’s a good chance the reply card was 4 bar or around it.

– A2: a lot of personalized notecards are this size. It’s also popular for save the dates or invitations (not usually wedding invites though- they tend to need more space!).

– #10: these have a bad rap because they’re the common business envelope size… aka, those envelopes bills come in. But the #10 envelopes stationers carry are a far cry from the office supply closet. These specialty #10s are usually top open, meaning the opening flap is on the short side, not the long side. We love these for invitations- they’re different but don’t need more postage than an A7 envelope.

– A7: If you’ve seen more than one wedding invitation, you’ve probably seen an A7. Coincidentally, A7s happen to be around the size of a DVD case- we measured just for you :) It’s a great invitation size and gives you plenty of room to work with.

Hope this helps form a frame of reference for you when it comes to stationery sizes!

background image: victoria selman photography

paper post: printing methods

littlebitheart_paperpost_printingmethods

Printing methods- which is best for your style and budget? What does each one look or feel (yes, we’d be the paper obsessed guests feeling your wedding invitation!) like? What DO all those words I keep hearing about mean anyway?

While this isn’t in any way an exhaustive guide, these tips are a great jumping off point into the wide wide world of printing. Just like around a poker table, each of these players has a “tell”- the dead giveaway that what you’re looking at is engraving, not thermography, or letterpress, not flat printing.

Letterpress

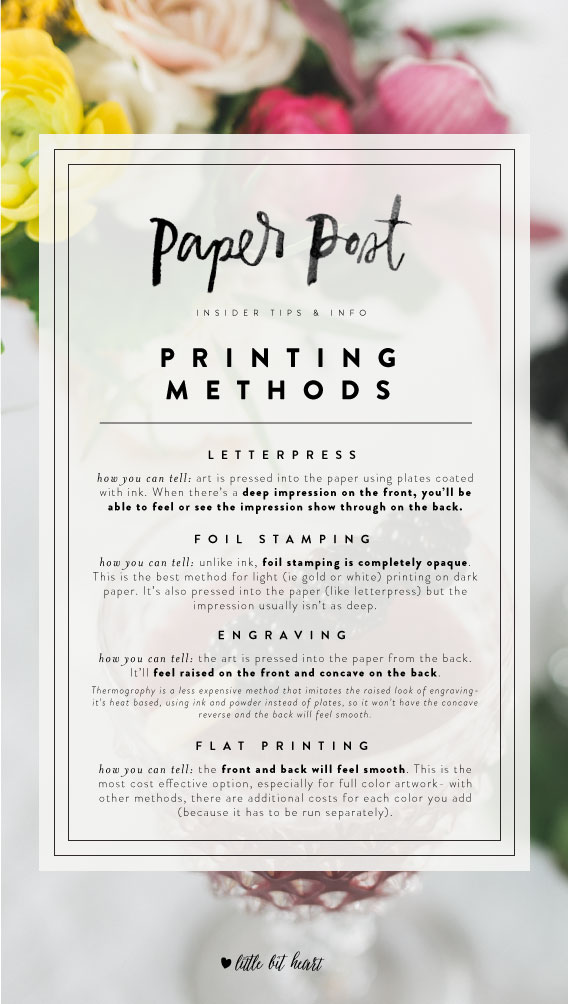
The tell: lettering or artwork is pressed into the paper. When there’s a deep impression on the front, you’ll be able to feel or see the impression show through on the back.

Run your finger across the lettering on a wedding invitation. If it’s dipping into the paper, that’s letterpress. Straight out of the 15th century, letterpress has made a huge comeback- particularly with wedding stationery- thanks to its gorgeous tactileness (made up word alert) and dedicated presses that are adapting this printed craft for modern stationery (that deep impression we love? That’s a relatively new thing you’d never see on an old-school letterpress piece). Letterpress, like engraving, is pressure based with a relief result- the plate pushing against the paper creates printing that you can feel.

Budget-wise: Expect a letterpress package to be at least double the cost of a flat printing one. This can vary depending on the amount of colors (each color is another set of plates and another run through the press), the type of paper you choose, the number of pieces in your suite, and if you’re adding any additional embellishments to your full set.

Engraving

The tell: the lettering or artwork is pressed into the paper from the back. It’ll feel raised on the front and concave on the back.

Back to that wedding invitation (or business card or whatever printed piece it is that you’re wondering about). When you run your finger across it, are the letters raised? Flip it over and check the back- is there a reverse impression into the paper? Yes? That’s engraving. Engraving can be beautifully formal- it’s a traditional wedding invitation printing method- and it can also shine in creative, modern designs (it handles light ink on dark paper like a champ). Also pressure based with a relief result, it’s kind of like the opposite of letterpress: the artwork’s raised, not impressed.

Budget-wise: The biggest budget hurdle with engraving is that it may not be cost effective for smaller runs. Again, your full set price will depend on several factors, including colors, papers, pieces, and embellishments.

Thermography is a less expensive method that mimics the look of engraving (to us, it doesn’t look quite as crisp)- it’s heat based, using ink and powder instead of plates, so it won’t have the concave reverse and the back will feel smooth.

Flat printing

The tell: both the front and back feel smooth. This is the most cost effective option.

Feels smooth on the front and on the back? That’s flat printing, which is an umbrella term for several different methods- offset, digital, laser, or inkjet are words that you might hear to describe printing or printers, and what they all have in common is that they’re all “flat”- no impression. Your stationer will know which flat printing method is best for your budget, paper and style. Flat printing is also where color is really going to wow you- with digital printing, you’ll get the full spectrum without any added color charges (with other methods, there are additional costs for each color you add because each color is a separate print run).

Budget-wise: Most likely, a form of flat printing is the least expensive option. Digital printing is more affordable and cost effective (it has a lower per piece price) than offset printing, particularly with small run jobs. Going with flat printing instead of a more expensive method may open up your budget to splurge on a unique bellyband or calligraphy, for example.

background image: victoria selman photography

paper post: save the dates

littlebitheart_paperpost_savethedates

Save the dates: when to send and what to include? As with wedding invitations, the guidelines are a bit different for holiday/destination weddings, but the basics are the same!

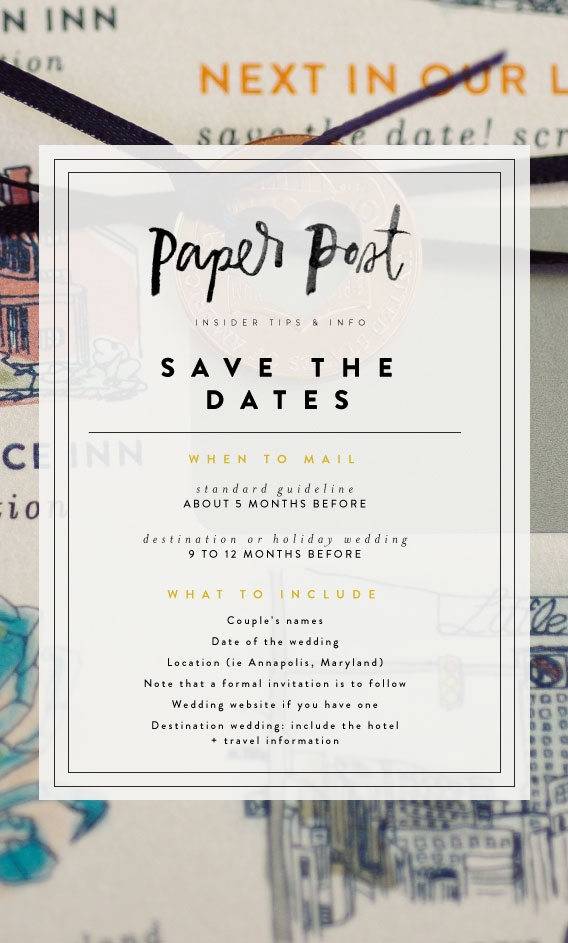
When to send: the general guideline is around 5 months before your wedding date. But if you’re having a destination or holiday wedding, plan to give your guests at least 9-12 months notice.

What to include:

– Couple’s names (of course!)
– Date of the wedding
– Location where the wedding will be held, ie “Annapolis, Maryland”
– Note that a formal invitation is to follow
– The address of your wedding website
– If it’s a destination wedding (or you have a lot of out of town guests!), hotel(s) should be listed as well travel information

background image: marcella treybig photography

paper post: wedding monograms

littlebitheart_paperpost_weddingmonograms

Wedding monograms… or as we like to think of them, wedding logos. Yep, time to brand your wedding! A monogram is the perfect element to tie your papergoods together- from the invitation to the table numbers to the out of town bags. We’ve had even had clients use them to create a gobo stencil for their dance floor lighting, or on their thank you notecards. If you have one of these created during your invitation process, it’s a great starting point for the rest of your wedding stationery. Here are some of our tips:

– Initial monograms look fantastic on wax seals! You can use both of your initials (“S & A”) or if you’ll be sharing a last name, one initial would be beautiful. Old school etiquette: the “new” last name monogram should be saved for the reception only (after you’re technically, married) but like we say with most stationery “rules”: know the rule, then you can break it! We’ve had clients hear the “no-last-initials until the reception” tradition and decide to skip it, and we’ve had clients go for it. It’s your day!

– Consider doing your first names in place of initials or adding your wedding date- this is a great way to expand your monogram into a wedding logo.

– Think about bringing in graphics, like a custom crest or illustration. With a wedding logo, you can share way more than your initials with your guests- let them get a glimpse of you both as a couple, or pick up on the feeling you want your wedding to have. Fun, right?

background image: cristina elisa photography